
A useful hot stamping trial is not one generic “good sample.” Plastic caps, paper boxes, and laminated surfaces need different support, different evidence, and different acceptance questions. The same foil mark can look acceptable on all three while hiding cap distortion, box compression, or weak bonding to a laminate.
This guide focuses on how to plan and record three material-specific trials. It complements PackFinish’s broader guide to packaging materials that can be hot stamped and its practical checklist for preparing samples for a hot stamping machine test.
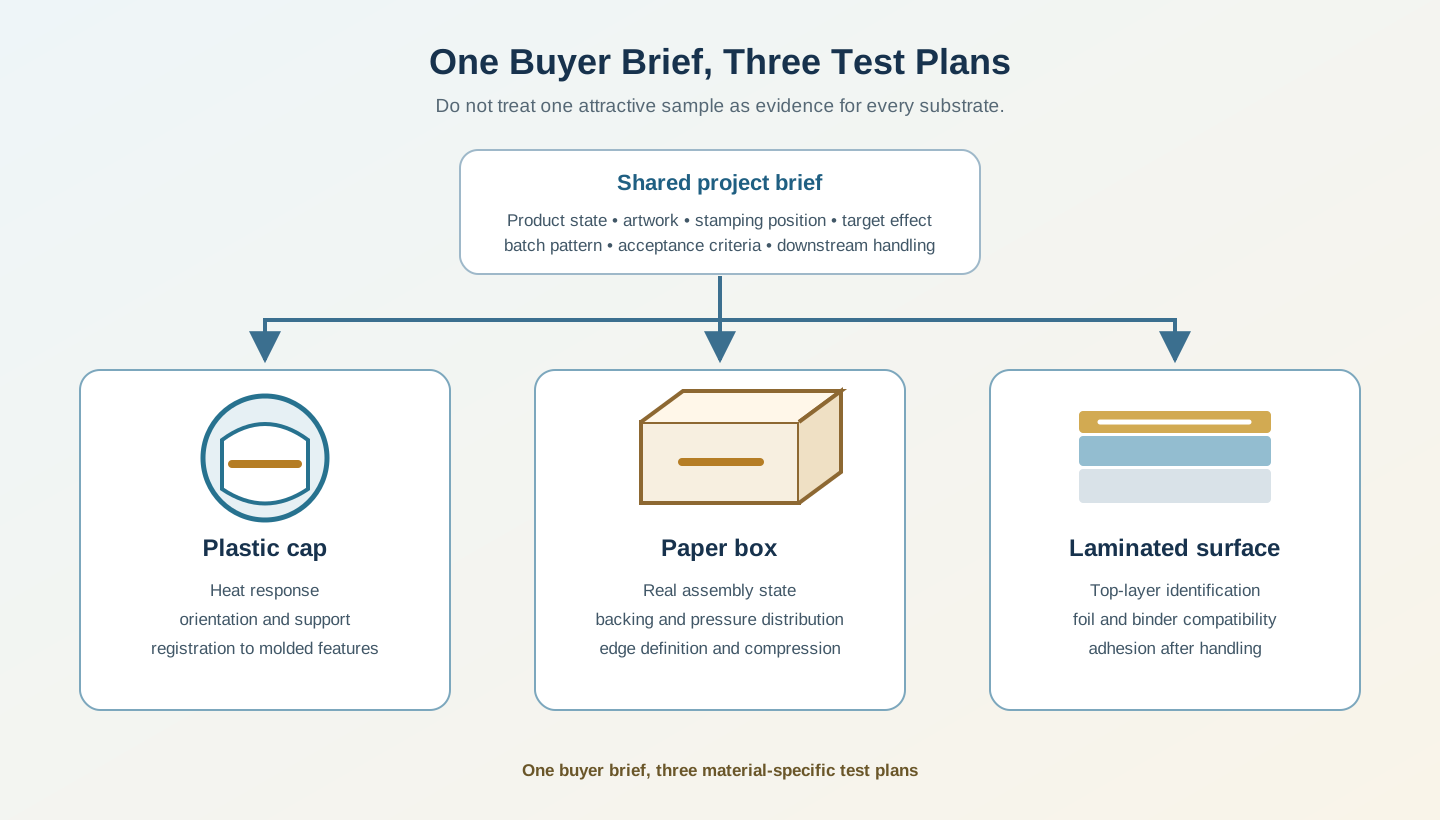
Start With One Buyer Brief, Then Split the Test Plan
Use one project brief to define the commercial objective, but create a separate test record for each substrate and product structure. The shared brief should identify:
- the finished product and its production state;
- material name, coating, lamination, ink, or treatment when known;
- artwork at final size and the exact stamping location;
- intended foil appearance and buyer-defined acceptance criteria;
- expected batch pattern, changeover frequency, and production target; and
- downstream handling such as folding, assembly, filling, rubbing, or packing.
After that, split the work. A cap trial should emphasize heat response and fixture control. A paper-box trial should emphasize support and pressure distribution. A laminated-surface trial should emphasize the outer layer and adhesion after cooling and handling.
Do not use one successful material as proof for another. Even visually similar items may have different resins, coatings, laminating films, adhesives, or construction details.
Use Different Test Pieces for Different Questions
The most informative test piece is not always the final logo. A trial should include artwork features that reveal the likely failure mode.
| Test feature | Plastic cap | Paper box | Laminated surface |
|---|---|---|---|
| Fine lines or small text | Reveals contact and registration changes on curved or molded geometry | Reveals edge spread, board marking, and local support problems | Reveals foil release and edge lifting on the top layer |
| Solid area | Reveals heat and pressure effects on part shape | Reveals fill uniformity and pressure distribution | Reveals broad-area adhesion and interlayer weakness |
| Position reference | Checks orientation to ribs, seams, or molded features | Checks alignment to panels, folds, or wrapped edges | Checks registration to print, coating, or converting marks |
| Repeated samples | Shows part-to-part height and molding variation | Shows flatness and structural variation | Shows coating, ink, or laminate-batch variation |
If the production artwork contains only one of these features, add a small technical test die or use several representative artwork areas during development. The purpose is to identify the process window before the buyer treats a decorative sample as production evidence. Use the controlled sequence in PackFinish’s temperature, pressure, and dwell-time guide to map the usable range and its defect boundaries.
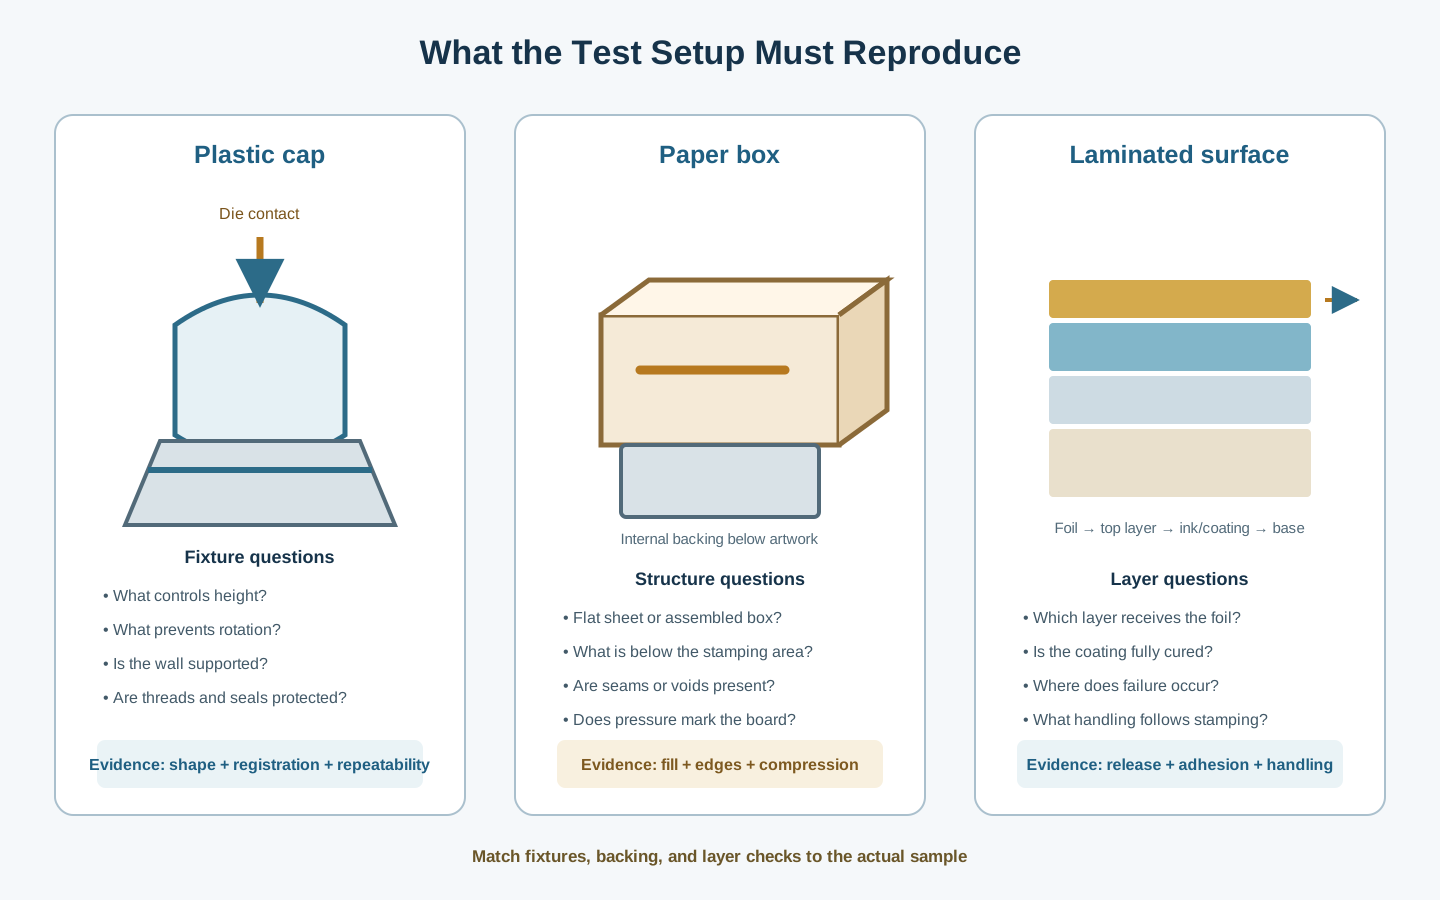
Plastic Cap Test Plan: Protect Shape and Control Orientation
Start with caps from normal production, not a different resin or a cosmetically similar sample. Record the material declaration, color, molding source, surface treatment, coating, and any recycled-content variation when the supplier can provide them. These inputs are context, not a substitute for testing.
The fixture should support the stamping zone, control height, and prevent rotation without damaging threads, seals, hinges, or thin walls. A flat top, recessed top, tapered side, and ribbed wall create different contact paths. Mark the artwork position from a repeatable cap feature so registration can be checked consistently.
During the trial, record:
- whether the cap rocks, rotates, or sits at different heights;
- whether the stamped area shows dents, gloss change, distortion, or pressure marks;
- foil transfer and adhesion after the cap has cooled;
- registration to the specified molded feature; and
- variation across consecutive caps and, when available, more than one production batch.
If positioning is unstable, solve the support problem before increasing heat or pressure. PackFinish’s guide to custom fixtures for packaging hot stamping explains why the nest is part of the process rather than a minor accessory.
Paper Box Test Plan: Reproduce the Real Support Condition
Define whether stamping will occur on a flat sheet, a wrapped panel, a partly assembled box, or a finished rigid box. These are not interchangeable test conditions. Walls, seams, recesses, wrapped edges, and internal voids change the backing below the die.
Use the same paper, coating, print, varnish, lamination, board construction, and assembly condition planned for production. A plain paper swatch may help screen a foil, but it cannot approve a finished-box process.
Record:
- support below the complete artwork area;
- fill consistency in solid regions and edge definition in fine details;
- board compression, die impression, surface marking, or damage to wrapped edges;
- registration to panel edges, folds, printed graphics, or hardware; and
- repeatability after normal loading and unloading.
Large solid areas and fine text should not be judged from the same visual criterion. A broad area exposes pressure-distribution and release problems, while small text exposes edge spread, missing strokes, and registration limits. The article on foil, dies, and fixtures for packaging hot stamping provides the wider tooling context.
Laminated Surface Test Plan: Identify the Layer That Receives the Foil
“Laminated paper” or “coated surface” is incomplete information. The foil contacts the outermost layer, which may be a film, varnish, cured ink, soft-touch finish, or another coating. A visually clean first transfer can still fail if the foil binder is incompatible with that layer or if the layer itself is poorly anchored.
The PackFinish guide to selecting hot stamping foil by packaging surface explains how foil release, coverage, adhesion, and heat response should be screened after that top layer is identified.
Test material from the intended printing, laminating, coating, and curing route. Record the layer stack as accurately as the supplier can provide it, including whether foil will land on film, ink, varnish, or an unprinted area.
Check the sample immediately after cooling and again after the handling steps relevant to the package. These may include rubbing, folding, wrapping, assembly, packing, or contact with the buyer’s normal filling process. Do not label an informal handling check as a standardized adhesion test unless a documented method and acceptance limit have been agreed.
Record:
- completeness of release and sharpness of the transferred edge;
- edge lifting, pick-off, scuffing, or loss during normal handling;
- whether failure occurs between foil and surface or within the coating/laminate stack;
- visible heat, gloss, or pressure change around the stamped area; and
- variation between production lots or finish versions.
When transfer is weak, trial a foil intended for the actual top layer before using higher temperature or pressure as the default remedy.
Record Evidence, Not Just Settings
A useful test report connects each result to the sample, tooling, fixture, foil, and operating condition. Avoid a loose folder of attractive photographs with no traceable test sequence.
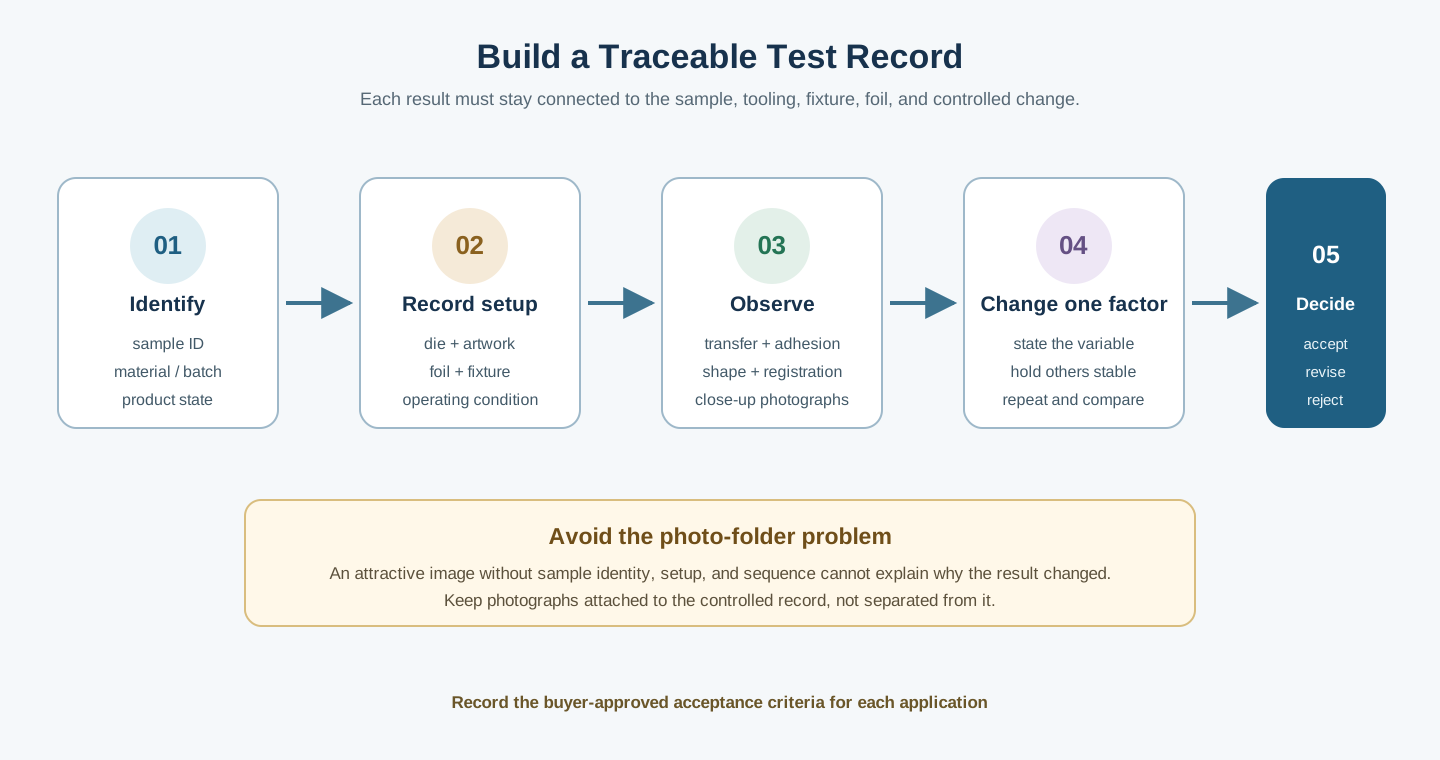
For each test stage, keep:
- a sample ID and material or batch note;
- the artwork or die revision;
- foil identification;
- fixture or backing description;
- machine and operating condition record;
- top, side, and close-up photographs under consistent lighting;
- the observed defect or acceptance result; and
- the next change made, with other variables held as stable as practical.
Changing several variables at once makes the result difficult to interpret. A controlled sequence helps separate material incompatibility from fixture, die, foil, machine, or setup problems.
Translate the Test Outcome Into a Machine Decision
The trial does not simply produce “pass” or “fail.” It should identify what the equipment and tooling must control.
| Evidence from the test | Likely decision implication |
|---|---|
| Cap needs orientation and wall support | Dedicated nest, anti-rotation reference, and a loading method matched to cap geometry |
| Finished box needs internal backing | Workholding or internal support designed around the assembled structure |
| Large paper area needs even contact | Pressure capacity and platen/support stability must suit the actual artwork area |
| Laminate accepts only a narrow foil/process window | Foil grade, temperature control, and documented setup become part of the approved process |
| Manual loading creates registration variation | Improve fixture error-proofing before considering a higher automation level |
| Stable samples and repeat batches are available | Evaluate manual, pneumatic, hydraulic, or automatic equipment against real throughput and changeover needs |
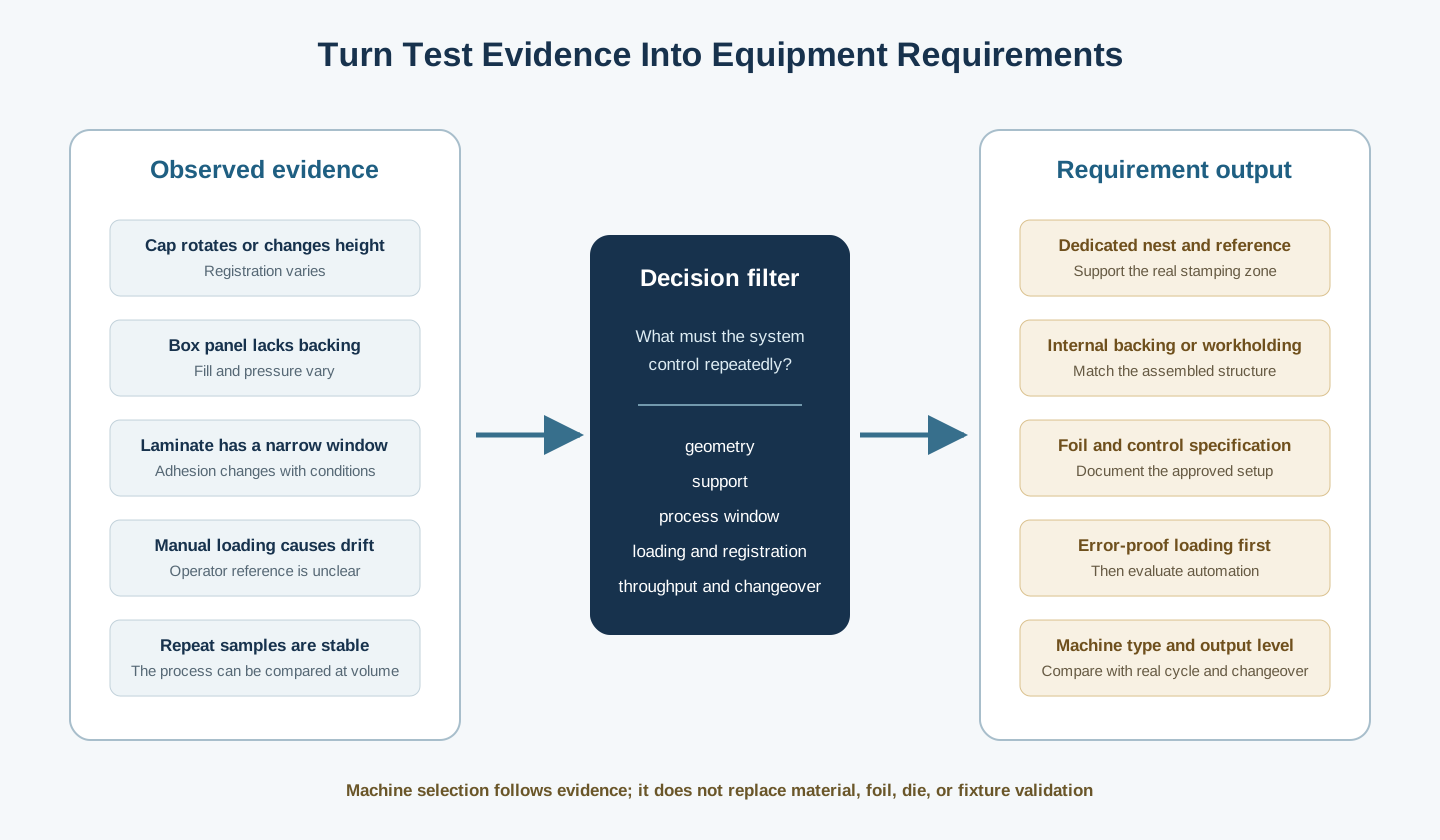
A larger or more automated machine does not repair an unsupported part or incompatible surface. Equipment selection should follow the sample review and the required process controls. For machine-level comparisons, use PackFinish’s guide to manual, pneumatic, hydraulic, and automatic hot stamping machines.
What to Send PackFinish for a Three-Material Review
Prepare a separate labeled sample set for each material group. Include actual parts, finished structures when relevant, artwork at final size, stamping-location drawings, material and surface notes, target appearance, production volume, and the buyer’s acceptance checks.
Also explain which variables are fixed and which are still open. For example, the product geometry and artwork may be fixed while foil grade, fixture design, and machine configuration remain under review.
This makes the supplier’s task clearer: compare three material-specific risks, document the evidence, and recommend the machine, foil, die, fixture, and operating approach that fit the real packaging job.
Contact PackFinish to review your samples and application details.