
Stable hot stamping process parameters are not one temperature, pressure setting, or dwell time copied from another job. A setting that works on coated paper with one foil and die may fail on a textured sheet, a laminated rigid box, or the same artwork on a different machine. Production needs a verified process window: a range in which transfer, edge definition, adhesion, registration, and substrate condition remain acceptable despite normal small variation.
If the immediate problem is missing foil, blurred edges, or weak adhesion, start with PackFinish's hot stamping defect troubleshooting guide. This article takes the next step: turning a corrected sample into a repeatable, product-specific production method.
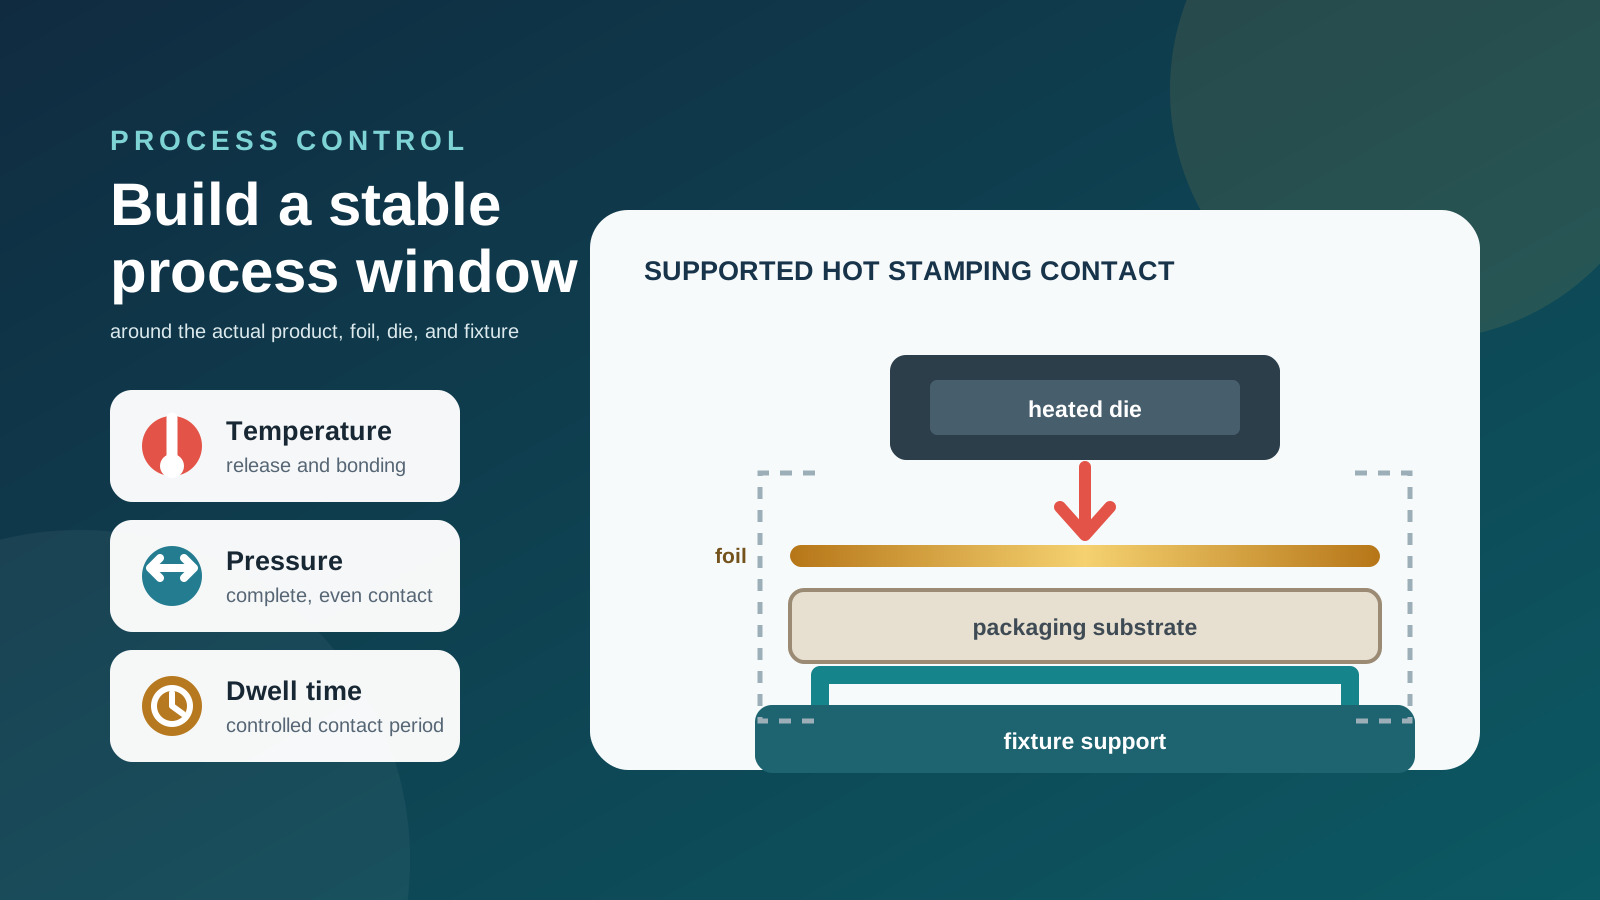
Stable Production Needs a Window, Not a Magic Number
A visually acceptable sample made at one exact setting may sit close to a failure boundary. A small change in substrate surface, foil batch, machine warm-up, operator loading, or fixture position can then push the next batch out of specification.
The nominal condition should sit inside a verified range, not at the lowest temperature that barely transfers, the highest pressure the product can tolerate, or the longest dwell time that hides poor contact. The window is specific to the machine, foil, die, fixture, substrate, stamping area, artwork, and loading method. PackFinish's guide to foil, dies, and fixtures for packaging hot stamping explains why these elements must be evaluated as one system.
Different constructions still require physical testing. Photographs can help review shape and artwork position, but they cannot confirm foil release, adhesion, heat sensitivity, pressure support, or a production-ready parameter range.
What Temperature Is Actually Controlling
Temperature helps the foil release from its carrier and bond to the substrate. The machine display is a control reference, but it may not equal the temperature at every point of the working interface. Die mass, heater layout, warm-up state, cycle frequency, and heat loss into the product all affect the contact condition.
Insufficient heat may appear as incomplete release, broken fine lines, pinholes in a solid area, or weak adhesion. Excessive heat may fill small counters, soften or widen edges, transfer foil outside the intended image, distort a laminate, or mark a heat-sensitive surface.
More heat is therefore not a universal correction for missing foil. The result must be read together with pressure distribution, dwell time, die condition, foil grade, and fixture support. UNIVACCO's hot stamping foil overview describes transfer as a heat-and-pressure process across many substrate types, while Crown Roll Leaf's product recommendation chart cautions that recommendations are guides and that each foil/application combination should be tested before production.
What Pressure Is Actually Controlling
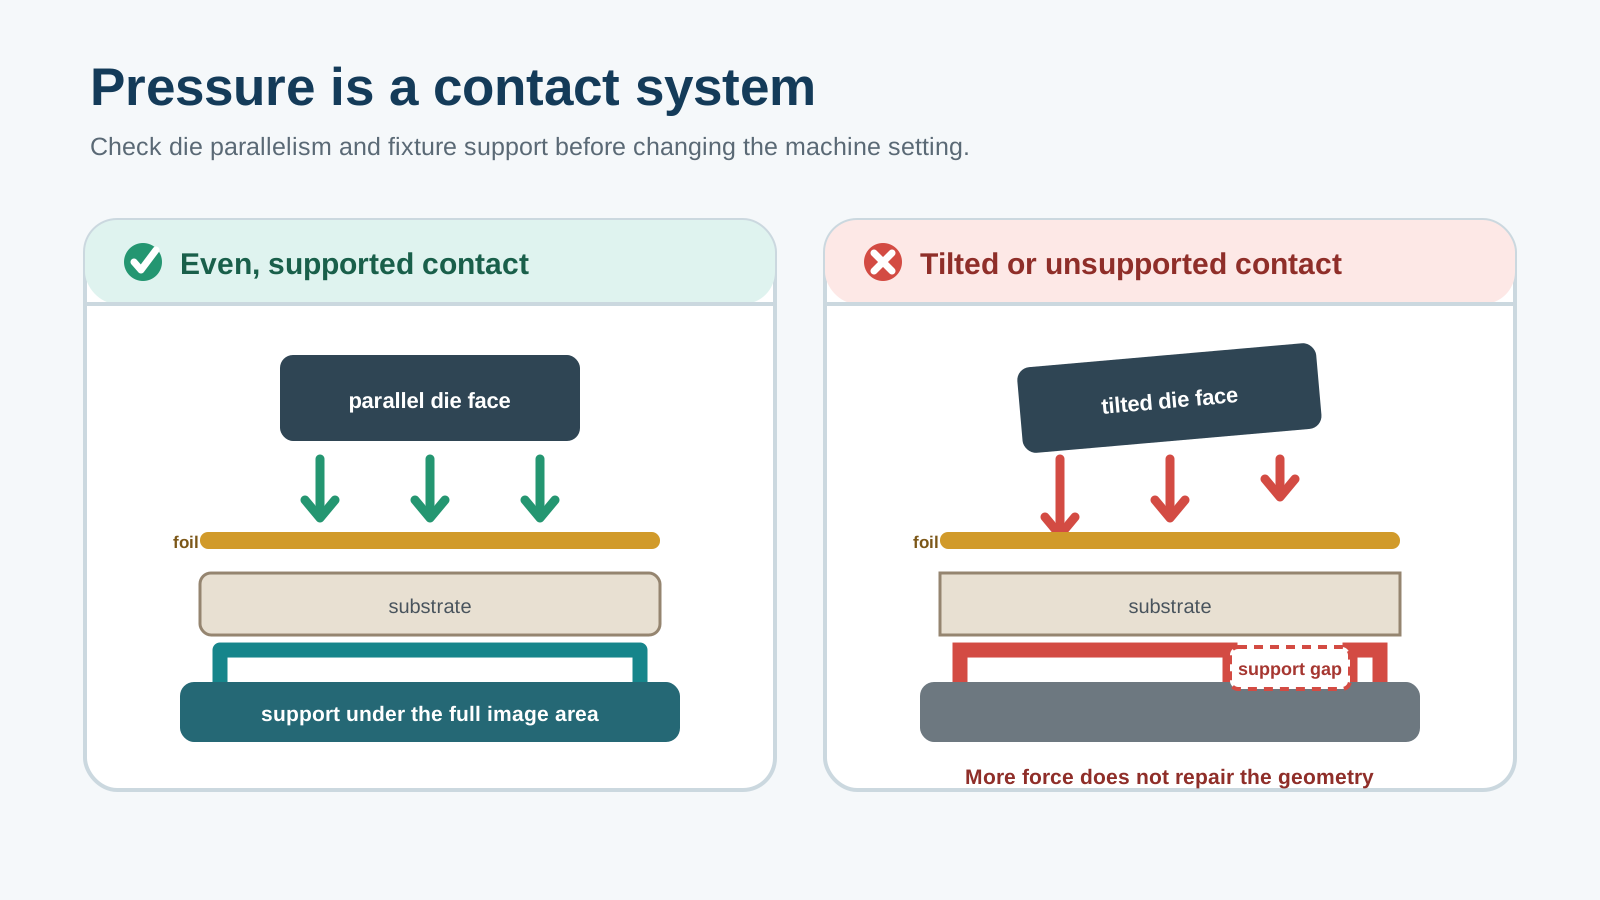
Pressure should create complete, even contact between the die, foil, and product. The practical question is not how much force the machine can apply, but whether that force reaches the entire stamping area without damaging the substrate.
Low or uneven pressure can leave missing sections, particularly on large solids, corners, textured surfaces, or unsupported box walls. Raising the setting will not necessarily correct a tilted die, loose mounting, worn make-ready, moving product, or poorly supported fixture.
Excessive pressure can crush paperboard, flatten texture, leave die marks, or spread foil beyond fine edges. On rigid and shaped packaging, the fixture is part of the pressure system. Verify die parallelism, support under the stamping area, product seating, and repeatable loading before parameter screening. When the product cannot sit flat or locate consistently, review whether a custom hot stamping fixture is needed.
How Dwell Time Affects Quality and Throughput
Dwell time is the period during which the heated die remains in contact under pressure. A contact period that is too short can produce incomplete transfer, especially before the tooling reaches a stable thermal condition.
Extending dwell time may improve transfer within a suitable range, but it should not compensate for poor contact, insufficient support, or an unsuitable foil. Excessive dwell adds heat input, may soften edges or affect sensitive surfaces, and reduces output.
The practical target is a dwell time that remains stable inside the verified temperature and pressure range while meeting appearance, adhesion, and production requirements. If throughput is important, record the complete cycle rather than treating dwell time as the only speed variable; loading, positioning, foil feed, unloading, inspection, and handling can also control the real output.
How to Test Hot Stamping Process Parameters in a Controlled Sequence
Fix the variables that are not under study. Use the same substrate construction and finish, foil reference and batch where practical, die, fixture, artwork position, machine, and inspection method. Label every sample so results are not mixed between lots or test stages. The sample preparation guide lists the product, artwork, and production information to prepare before a machine trial.
- Verify the mechanical setup. Check die condition, parallel contact, make-ready, fixture support, product positioning, and foil path. Parameter data is unreliable if the product shifts or only part of the die contacts the surface.
- Choose a conservative baseline. Use a documented test on a genuinely similar construction, current foil-supplier guidance, or a controlled preliminary trial. Do not start from a generic setting taken from an unrelated machine or substrate.
- Screen temperature. Hold pressure and dwell time steady while stepping temperature through a cautious range. Stop when the substrate, coating, or edge quality shows an unacceptable response.
- Screen pressure. Inside the usable thermal region, hold temperature and dwell time steady while evaluating contact completeness, fine detail, solid coverage, and substrate marking.
- Screen dwell time. With the candidate temperature and pressure held, identify a contact-time range that completes transfer without unnecessary heat exposure or cycle loss.
- Confirm the interaction. Test combinations slightly below, at, and above the candidate nominal condition. The final confirmation must evaluate the combined process, not three isolated controls.
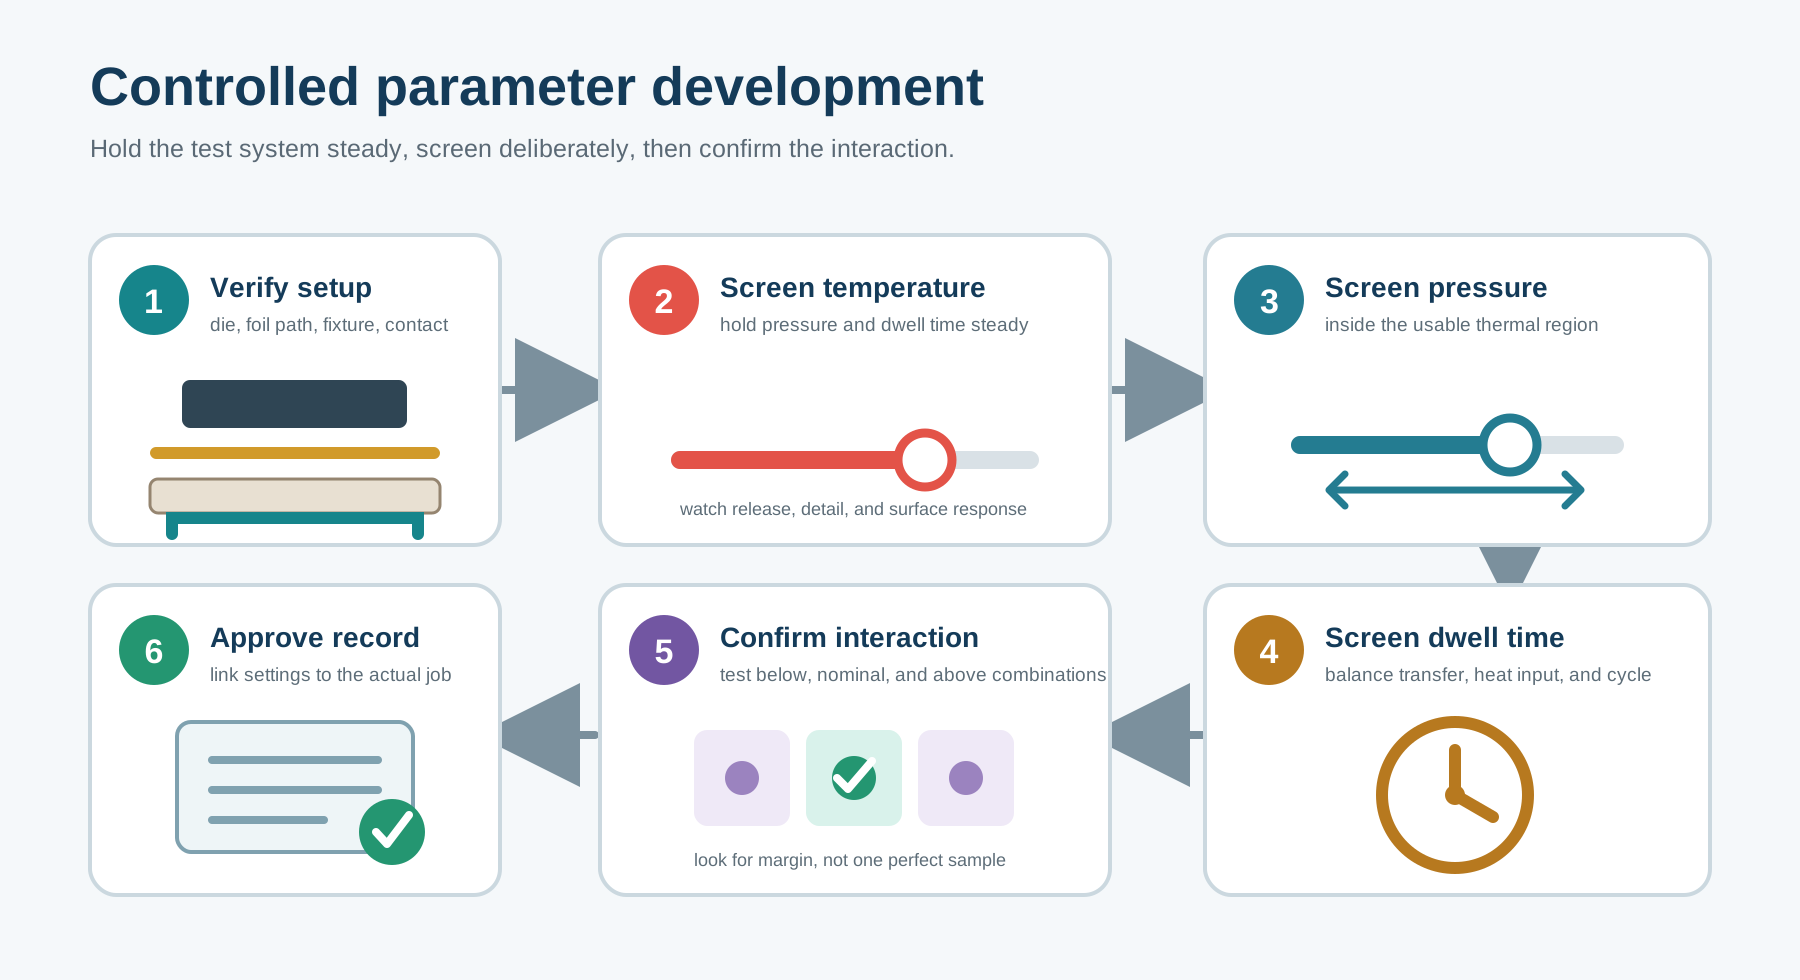
Record the result, not only the setting. Useful observations include transfer completeness, edge definition, open fine detail, solid-area uniformity, adhesion by the agreed method, registration, substrate damage, and visible change after cooling or handling. Photograph samples under consistent lighting and keep them in test order.
Changing foil, substrate, die, fixture, artwork area, or machine creates a new test condition. Do not compare those pieces as if only one parameter changed.
How to Define a Production-Ready Process Window
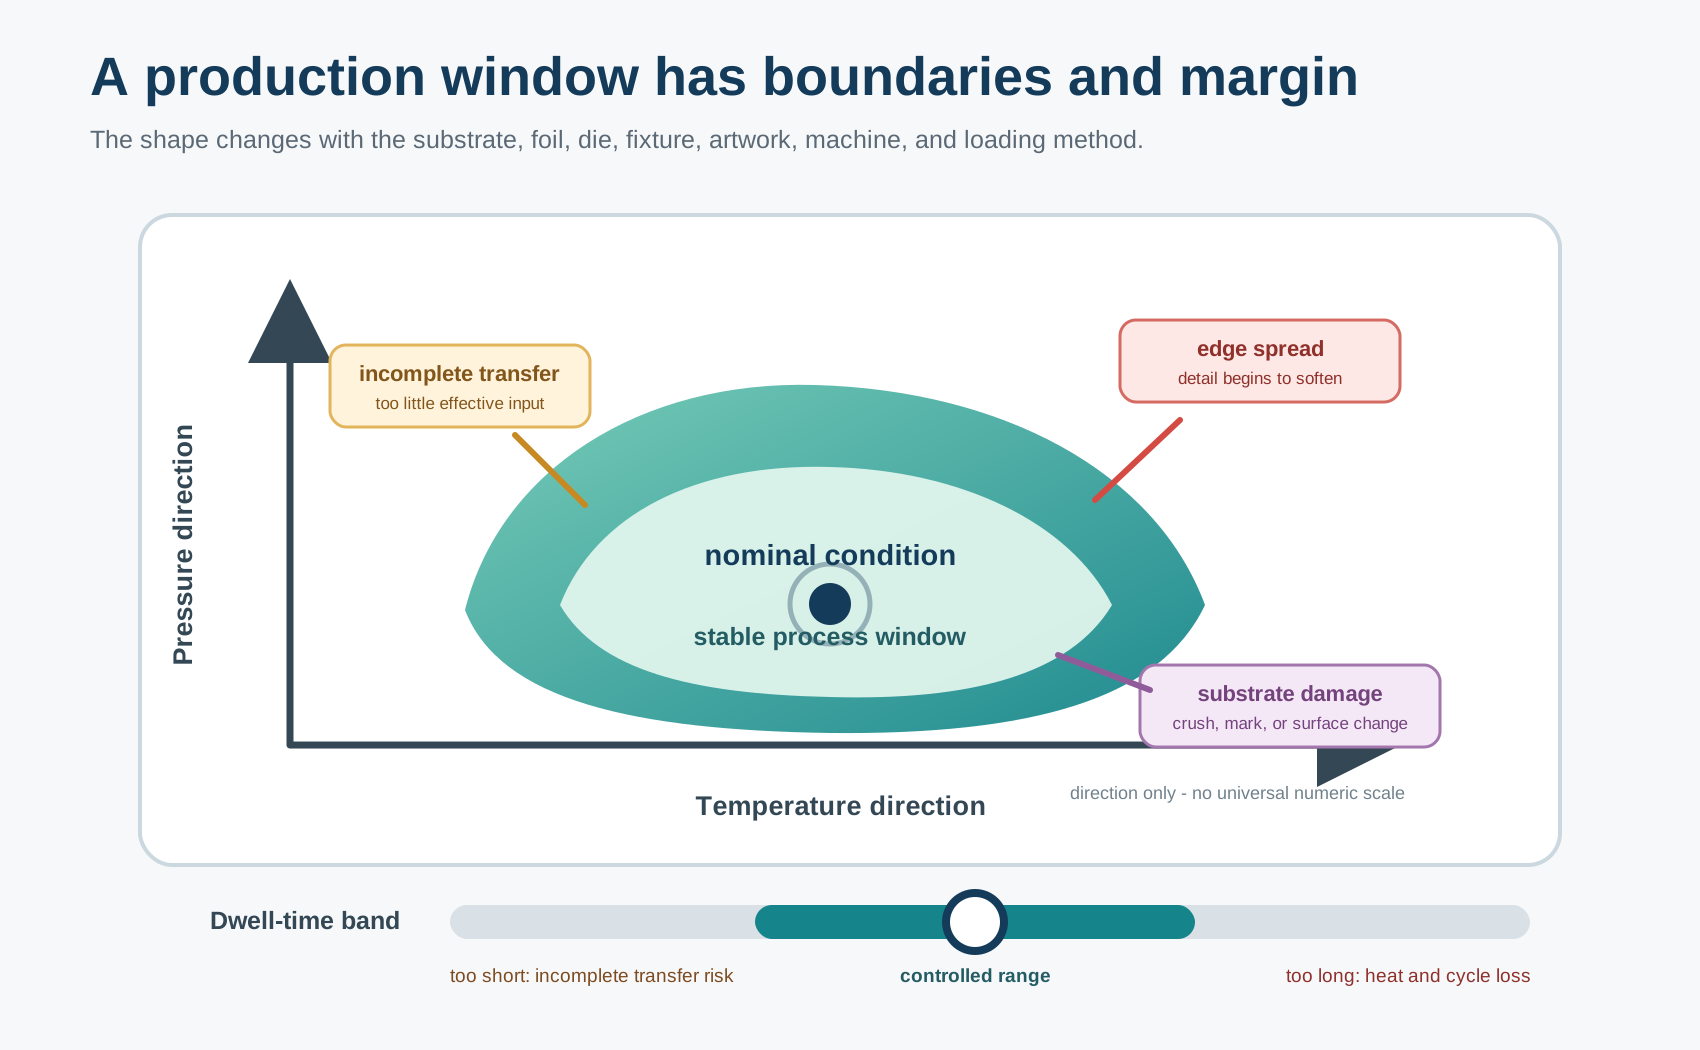
The best-looking single piece is not the process window. A production-ready window is a region in which consecutive samples meet the agreed criteria under realistic small variations.
Map the boundaries deliberately:
| Variable direction | Early warning to watch | Boundary to avoid |
|---|---|---|
| Lower temperature or shorter dwell | broken fine lines, pinholes, incomplete release | transfer or adhesion no longer meets the agreed sample |
| Higher temperature or longer dwell | edge softening, filled counters, surface change | artwork detail or substrate condition becomes unacceptable |
| Lower or uneven pressure | local missing foil, side-to-side coverage change | full stamping area no longer transfers consistently |
| Higher pressure | texture flattening, die mark, foil spread | product deformation or edge definition fails |
Choose the nominal condition away from these boundaries. A window narrower than the machine's normal control variation is not robust; it may indicate that the foil, die, fixture, substrate, artwork, or equipment configuration needs improvement.
Validate the Window Under Production Conditions
A bench trial is only the beginning. Confirm the candidate window after normal warm-up, during a sustained run, and after a routine stop and restart. Where practical, include more than one substrate or foil production lot and the intended loading method.
Acceptance criteria should cover the parts of the artwork that are hardest to reproduce: fine lines and counters, large solid areas, edge cleanliness, registration to a stable datum, adhesion using the agreed method, substrate condition, and batch consistency. A documented hot stamping test plan for production materials can help separate feasibility, process-window, and repeatability checks.
Do not hide interruptions or rejected pieces when reviewing the run. A stable method should explain what happened before, during, and after a stop, adjustment, foil change, reload, or normal operator event.
Store Parameters by Product, Foil, Die, and Fixture
Each approved job should have its own record:
- product or SKU and substrate lot;
- surface coating, printing, or lamination;
- foil reference and lot;
- die ID, artwork area, and die mounting;
- fixture ID, datum, and loading method;
- machine ID and warm-up condition;
- temperature control reference;
- pressure control reference;
- dwell time and relevant cycle notes;
- inspection method and acceptance criteria;
- approved sample IDs and images;
- test date, operator, and any changes made during the run.
These records make repeat setup faster, but they are starting points rather than universal recipes. Machine displays, pressure scales, thermal behavior, and material lots differ, so the record must remain linked to the equipment and tooling on which it was validated.
Prepare a Product-Specific Stamping Test
For a PackFinish review, provide the actual substrate or product, foil requirement if known, artwork file, stamping location, image dimensions, target quantity, available samples, loading method, and acceptance requirements. This information helps define a practical test plan for the machine, die, fixture, foil, and process as one production system. Contact PackFinish with the product and test details.
FAQ
Can one temperature setting be used for every hot stamping foil?
No. Foil construction, substrate, die, stamping area, machine, and loading conditions differ. Establish the working range with the actual combination.
Should pressure be increased whenever foil is missing?
Not automatically. Missing foil may come from temperature, dwell time, uneven contact, fixture support, foil selection, contamination, or substrate variation. Check the defect pattern and mechanical setup first.
Which variable should be adjusted first?
Correct die alignment, fixture support, product positioning, and foil path first. Then screen temperature, pressure, and dwell time in a controlled sequence before confirming their interaction.
What makes a process window suitable for production?
It should produce acceptable consecutive samples across a verified range and tolerate normal small changes in warm-up, loading, material condition, and routine stops without crossing a defect boundary.